

To safely transfer a senior from bed to wheelchair, you should prepare the environment by clearing hazards and gathering equipment like a transfer belt. Assess their mobility, position the wheelchair close, and lock the brakes. Support their sitting posture, secure the transfer belt snugly, and use proper body mechanics when guiding them to stand. Pivot carefully, lower them into the chair, and ensure they’re comfortable and stable. Keep safety in mind at every step to prevent injury—more tips await if you keep going.
Key Takeaways
- Prepare the environment by clearing hazards, positioning the wheelchair close with brakes unlocked, and gathering necessary equipment.
- Assess the senior’s mobility and support needs, ensuring proper positioning and secure transfer belt placement.
- Lock the wheelchair brakes, remove obstacles, and confirm the transfer area is safe and hazard-free.
- Use proper body mechanics, assist the senior to a standing position, and pivot carefully into the wheelchair.
- Ensure the senior’s feet are supported, check comfort and stability, and finalize safety adjustments before completing the transfer.
Prepare the Environment and Gather Necessary Equipment

Before beginning the transfer, you need to prepare the environment to guarantee safety and efficiency. First, clear the area of all tripping hazards like loose rugs, blankets, or clutter that could cause falls. Make sure there’s enough space around the bed and wheelchair to move comfortably. Position the wheelchair close to the bed at a 45-degree angle, with brakes engaged and casters locked. Remove or swing away the footrests and armrests if they obstruct the transfer. Gather all necessary equipment beforehand, including a transfer belt, gloves, and any assistive devices. Check that the patient’s footwear provides good support and tread to prevent slipping. Taking these steps reduces the risk of accidents and ensures a smooth, safe transfer process for both you and the patient. Additionally, verifying the stability of the environment can help prevent unexpected shifts or falls during the transfer. Ensuring the environment’s stability aligns with best practices for safe patient handling.
Assess the Patient’s Physical Condition and Mobility Level

Start by carefully observing the patient’s current physical condition and mobility level. This helps you determine the safest transfer approach. Consider these key points:
- Check if the patient can sit, stand, or needs assistance with both.
- Identify any muscle weakness, joint pain, or balance issues.
- Note if they require support devices like a walker or cane.
- Assess their endurance and willingness to participate in the transfer.
- Be aware of vetted wave and wind conditions that could impact safe transfer procedures.
- Recognize the importance of understanding Gold IRA Markets to ensure comprehensive care planning, especially if the patient has investments or financial considerations related to retirement planning.
- Additionally, understanding proper mobility assessment techniques can greatly enhance safety and effectiveness during transfers. Incorporating proper assessment techniques helps tailor the transfer method to the patient’s specific needs, reducing the risk of injury. Gaining knowledge of mobility assessment methods is essential for ensuring thorough and accurate evaluations.
Position the Wheelchair Correctly for Transfer

To set up for a smooth transfer, position the wheelchair at a 45-degree angle to the bed. Make sure it’s on the patient’s stronger side to reduce effort and increase safety. Also, clear the surrounding area of obstacles to prevent trips or falls during the move. Proper equipment setup can further enhance safety and ease during the transfer process. Being aware of the net worth of individuals involved can help plan for necessary resources or support. Additionally, ensuring adequate ventilation considerations can improve overall safety and comfort for both the patient and caregiver. Incorporating technological aids such as transfer assist devices can also facilitate the process and reduce physical strain, especially when considering caregiver safety protocols.
Angle the Wheelchair Properly
Positioning the wheelchair at the right angle is key to a safe, smooth transfer. You want to set it at about a 45-degree angle to the bed, which shortens the transfer distance and makes it easier for the senior to move. To do this:
- Move the wheelchair close to the bed, ensuring stability.
- Turn the wheels slightly to the side, aligning with the bed.
- Lock the brakes to prevent slipping.
- Remove or swing away armrests and footrests if they’re in the way.
- Always consider ergonomic principles to ensure the transfer is efficient and reduces caregiver strain.
- Paying attention to proper body mechanics can further reduce the risk of injury during transfer.
- Be mindful of safe transfer techniques to promote comfort and prevent falls during the process.
This setup helps the senior pivot comfortably and reduces strain on your part. Proper angling minimizes effort and risk, creating a safer transfer for both of you. Always double-check stability before proceeding.
Place on Stronger Side
Placing the wheelchair on the patient’s stronger side improves stability and makes the transfer easier. Position the chair close to the bed, at a 45-degree angle, to reduce movement and effort. Ascertain the wheelchair is locked, and the brakes are engaged to prevent slipping. Remove or swing away the armrests and footrests if they obstruct the transfer path. Make sure the wheelchair is aligned so the patient’s stronger side faces it directly, allowing for a smoother pivot. Confirm there’s enough space around the chair for safe maneuvering. Check that the seat height is appropriate, with the patient’s feet flat on the ground once seated. Proper placement on the stronger side helps you maintain control and supports the patient’s balance during the transfer.
Clear Surrounding Area
Ensuring the surrounding area is clear before transferring a senior is essential for safety and efficiency. A cluttered space increases the risk of trips and falls, making the transfer more dangerous. To prepare, follow these steps:
- Remove all tripping hazards like loose rugs, cords, or small objects.
- Clear the transfer path of furniture or obstacles that could obstruct movement.
- Ensure the wheelchair is positioned close to the bed, with brakes engaged to prevent rolling.
- Check that the area has enough space for you to move comfortably without twisting or overstretching.
- Confirm that the environment is free of hazards that could compromise safety during transfer.
Secure the Wheelchair and Remove Obstructions

Before starting the transfer, make sure the wheelchair brakes are locked to prevent movement. Clear the transfer area of any obstacles like rugs, cords, or clutter that could cause tripping. Taking these quick steps guarantees a safer, smoother transfer for both you and your patient. Additionally, ensure the essential oils used for comfort are safely away from the transfer zone to prevent spills or accidental contact. It is also helpful to check the home environment for adequate lighting and accessible pathways to support a safe transfer. Ensuring a safe environment aligns with the core principles of injury prevention and promotes confidence during the transfer process. Using security zone principles can help identify potential hazards and improve overall safety during patient transfers. Regularly inspecting the electrical setup of your home can further prevent hazards that could compromise safety during transfers or other activities.
Lock Wheelchair Brakes
Have you locked the wheelchair brakes to prevent movement during the transfer? Ensuring the brakes are engaged keeps the wheelchair stable, reducing the risk of accidents. To do this effectively, follow these steps:
- Confirm the wheelchair is on a flat surface before locking.
- Push down firmly on the brake levers or pedals to secure both rear wheels.
- Check that the wheels do not move when you gently try to push the chair.
- Rotate the casters backward if possible, to prevent any accidental rolling.
- Regular maintenance and inspection of wheelchair brakes help maintain safety and proper functioning.
Clear Transfer Area
To prepare the transfer area, start by clearing all potential tripping hazards, such as loose rugs, sheets, blankets, and pillows. Make sure the floor is clean and dry to prevent slips. Secure the wheelchair by engaging the brakes and rotating the casters backwards so it doesn’t roll. Position the wheelchair close to the bed, ensuring it’s stable and on a level surface. Remove or swing away the armrests and footrests that might obstruct the transfer. Check that there’s enough space around the wheelchair for easy movement. Clear pathways for your own movement and the patient’s. Confirm the wheelchair is secure and well-positioned before beginning the transfer. This preparation minimizes risks and creates a safe environment for both you and the senior. Additionally, reviewing home safety guidelines can further help in creating a secure transfer environment. Incorporating proper transfer techniques can also enhance safety and reduce injury risk during the process. Ensuring the environment is free of water hazards can prevent slipping accidents during the transfer process.
Apply the Transfer Belt Properly for Support

Applying the transfer belt correctly is essential for guaranteeing both your safety and the patient’s stability during the transfer. To do this effectively:
- Wrap the belt around the patient’s hips, positioning it at the natural waistline.
- Ensure the belt is snug but not too tight—you should be able to insert two fingers comfortably.
- Fasten the buckle securely, avoiding any twists or uneven placement.
- Check that the belt lies flat against the skin, providing firm support without causing discomfort.
Proper application gives you a secure grip, helping prevent slips or falls. Always communicate with the patient during this process to ensure they feel supported and comfortable. A well-placed transfer belt is key to a safe, smooth transfer.
Use Proper Body Mechanics for Caregiver Safety

Using proper body mechanics is essential to protect yourself from injury while transferring a senior. Keep your feet shoulder-width apart, with one foot slightly ahead of the other for stability. Always bend at your hips and knees, not your waist, to lift or support the patient. Maintain a straight back and avoid twisting your torso during the transfer. Keep the load close to your body to reduce strain on your back. Use your leg muscles, not your back, to lift or pivot. When moving or pivoting, turn your whole body instead of twisting at the waist. Stand close to the patient to minimize reaching. Engaging these techniques helps prevent injury and ensures a safer transfer for both you and the senior.
Execute the Standing Pivot Transfer Technique
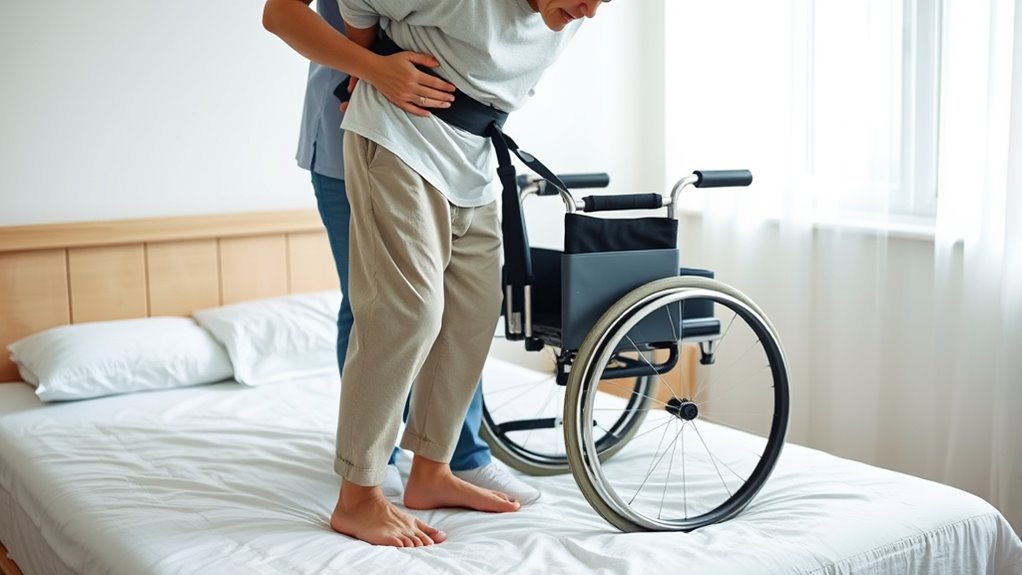
When performing a standing pivot transfer, start by assisting the patient to a stable standing position, guaranteeing they have firm support at the hips. Once upright, follow these steps:
- Guide the patient to place their outside leg (farthest from the wheelchair) between your knees for support.
- Count aloud to three, then help them stand slowly, encouraging them to support their weight.
- Pivot the patient towards the wheelchair, moving their feet so your hips align.
- Bend your knees, shift your weight to the front leg, and gently lower the patient into the wheelchair seat.
Keep your back straight, use proper body mechanics, and guarantee the patient remains balanced throughout the process for a safe transfer.
Ensure Patient Comfort and Proper Seating in the Wheelchair

To guarantee patient comfort and proper seating in the wheelchair, it’s essential to carefully position the patient and adjust the seat for ideal support. Make sure their hips are all the way back in the seat, with legs comfortably supported by the footrests. Check that their back is well aligned, and use cushions if needed for extra support or pressure relief. Ensure their feet rest flat on the footplates, and their knees are at a comfortable angle. Adjust the armrests and footrests so they don’t cause discomfort or pressure points. Confirm the patient’s head and neck are properly supported, especially if they have limited control. Finally, ask how they feel and make any necessary adjustments to maximize comfort and promote proper posture during sitting.
Verify the Safety and Stability of the Transfer

Before completing the transfer, you need to check that the wheelchair is stable and secure. Confirm the patient’s position is correct and that they are supported properly to prevent falls or discomfort. Taking these steps guarantees the transfer is safe and reduces the risk of injury for both of you.
Check Wheelchair Stability
After positioning the patient in the wheelchair, you should immediately verify its stability before leaving the transfer area. First, check that the wheelchair brakes are engaged and locked to prevent movement. Next, ensure the casters are rotated backward or locked in place. Then, gently push or lean on the wheelchair to confirm it doesn’t shift or wobble. Finally, verify that the wheelchair is on a level surface and not tilted or uneven. If any instability is present, readjust the wheelchair’s position or re-engage the brakes. Confirm the wheelchair’s wheels are properly aligned, and there are no loose or damaged parts. These steps help guarantee safety and prevent accidents once the patient is seated.
Confirm Patient Positioning
Once you’ve confirmed that the wheelchair is stable and secure, it’s time to check the patient’s positioning. Ensure the patient is sitting upright with their hips all the way back in the seat. Their feet should be flat on the footrests or on the floor if footrests are removed. Check that their back is supported and aligned properly against the wheelchair backrest. Make sure their knees are bent at a comfortable angle and that their legs are not crossed or dangling awkwardly. Confirm their head and neck are in a neutral position, not tilted or strained. Adjust the patient if needed, so they’re comfortably seated and stable before proceeding. Proper positioning reduces the risk of falls or discomfort during and after the transfer.
Ensure Proper Transfer Support
To guarantee the transfer is safe and stable, you need to verify that the patient is properly supported throughout the process. First, check that the transfer belt is snug around their hips, providing a secure grip. Second, ensure their feet are flat on the floor or wheelchair footrests for stability. Third, confirm their back and head are supported with pillows if needed, preventing strain. Fourth, make sure the wheelchair is locked, with brakes engaged, and positioned correctly. These steps help maintain balance, reduce fall risk, and keep the patient comfortable. Always stay attentive, communicate clearly, and adjust support as needed during the transfer to ensure safety for both you and the patient.
Provide Post-Transfer Care and Adjustments

Ensuring patient comfort and safety is a crucial step immediately following the transfer. You should check that the senior is seated securely and comfortably, with their back supported and feet flat on the footrest or floor. Adjust the wheelchair if needed, guaranteeing it’s locked and stable. Confirm that their clothing is smooth and not restricting movement. Use this table to guide your adjustments:
| Adjustment Area | Action |
|---|---|
| Seat Position | Make sure they’re centered and supported |
| Footrests | Adjust or reposition for comfort |
| Belts | Guarantee transfer belt isn’t too tight |
| Clothing | Remove wrinkles or bunching |
| Environment | Clear the area for easy movement |
These steps help prevent discomfort and reduce fall risk, guaranteeing a safe, comfortable experience.
Frequently Asked Questions
How Can I Transfer a Patient With Limited or No Weight-Bearing Ability Safely?
When transferring a patient with limited or no weight-bearing ability, use a mechanical lift or transfer device for safety. Guarantee all equipment is properly set up, with secure straps and supports. Keep the patient’s body aligned, support their head and neck, and communicate clearly throughout. Always work with a team if possible, maintain good body mechanics, and move slowly to prevent injury or discomfort during the transfer.
What Signs Indicate a Patient Is Not Ready for Transfer?
You’ll notice signs like resistance, pain, or discomfort when attempting the transfer. If the patient shows muscle weakness, unsteady movements, or attempts to pull away, it’s a clear indicator they’re not ready. Watch for dizziness, fatigue, or changes in essential signs, which suggest they need more stabilization. Never force a transfer; waiting for the patient to be physically and mentally prepared ensures safety and prevents injury.
How Do I Handle a Patient Who Is Fearful or Resistant to Transfer?
You might think fear is just resistance, but it’s your patient’s way of protecting themselves. To handle this, speak calmly, reassure them you’re there to keep them safe, and explain each step clearly. Offer support, listen to their concerns, and go at their pace. Sometimes, a gentle touch or a familiar voice can ease anxiety. Remember, patience turns resistance into trust, making the transfer smoother for both of you.
What Should I Do if the Patient Begins to Fall During Transfer?
If the patient begins to fall during transfer, immediately support their body to prevent injury. Keep a firm grip on the transfer belt and lower them gently to the ground, guiding their fall if possible. Clear the area of obstacles, and make certain their head is protected. Call for help if needed, and assess their condition before attempting to relocate them safely, prioritizing their safety and comfort at all times.
How Can I Modify the Transfer Process for Patients With Specific Medical Conditions?
When working with patients who have unique medical needs, you adapt your approach to facilitate comfort and safety. For example, if they have weak muscles, consider using a mechanical lift instead of a manual transfer. For those with joint issues, minimize twisting and support their limbs gently. Always review their condition and coordinate with healthcare professionals, adjusting your technique for a smoother, safer shift that respects their individual limitations.
Conclusion
Now that you’ve mastered the art of the perfect transfer, you’re practically a superhero in disguise—minus the cape and with a little more patience. Remember, safety first, because dropping your senior like a hot potato isn’t exactly a badge of honor. With these tips, you’ll make transfers smoother than butter and keep everyone happy and secure. Who knew that moving a loved one could be this entertaining? Happy transferring!